Creator workflow guide
How to Edit YouTube Shorts in TrendyTube Creator Tools
Refine a generated Short before sharing it. Learn how to trim scenes, move the camera framing between speakers, correct captions, choose effects and animations, save a Modified version, and export the finished video.
Before you begin
Open a generated Short on desktop or a wide tablet.
Use the timeline to split and select segments, then set the overall video shape before reframing individual scenes. Save your Draft to keep the edits; the export confirmation shows how many free exports remain for the generation batch.
Part 01 · Follow the steps
Edit, reframe, save and export your Short
Trim and frame
Open a generated Short
In the Shorts workspace, open a completed generation, choose a clip from Main, and select Edit. Watch the video once, noting where the opening, transitions, framing, subtitles or ending need work. The editor initially labels an unsaved edit as Draft; changing things on screen does not by itself create a saved Modified version.
Set the clip's beginning and ending
On desktop or a wide tablet, select Timeline below the video player if the trimming controls are hidden. The orange-outlined section of the timeline is the footage that will remain in your Short. You can change its beginning (In) and ending (Out) in either of the two ways below; both adjust the same trim boundaries.
A little extra footage for flexibility: TrendyTube normally includes a small amount of footage before and after the extracted moment, when available. If the Short begins too abruptly or its ending cuts off a word, you can move In earlier or Out later to include more of that footage. You can also move them inward to make the Short tighter. Replay the beginning and ending before saving.
Use Zoom to see the timeline more precisely; it does not change video playback speed. The full timeline and Cut/Delete controls are best accessed on a desktop or wide tablet.
Two ways to set the In and Out points
Type exact In and Out times
Find the In and Out time values beside the player controls. Click either value, type the precise timestamp in M:SS.ss format (for example 0:03.50), then press Enter or click away to apply it. Use In for where the Short starts and Out for where it ends.
Drag the orange start and end handles
Open Timeline and locate the orange-outlined clip range. Drag the left orange handle to set the start (In), or the right orange handle to set the end (Out). Move a handle outward to include more of the available footage or inward to remove unwanted material. The In/Out times update with your changes.
Cut, Delete and Zoom

Timeline and trim times
Toolbar details: Cut and Delete become available when their conditions are met. Select, split and remove timeline segments
The thin colored segment strip above the timeline thumbnails represents the separate scenes. Click a colored segment to select it; click that same segment again, or click the timeline ruler outside the segment, to deselect it. Look for the stronger highlight and end handles to confirm your selection.
To remove a passage from the middle, move the playhead to the start of the unwanted material and choose Cut. Move to its end and choose Cut again. Click the resulting unwanted colored segment, then choose Delete. Cutting creates segment boundaries; Delete removes the selected segment. At least one other segment must remain. Use Undo or Redo, and play across the join to check that the speech and motion still flow naturally.
No segment selected


The aspect-ratio control applies to the whole Short.
Segment selected


The control uses the selected segment's color and edits that segment's framing.
The highlight and handles indicate selection. Segment colors can vary. Choose the aspect ratio for the entire Short
First deselect every timeline segment. Select Change Aspect Ratio from the player controls. In the crop dialog, choose the output shape and move the crop box to establish the default camera framing across the Short, then select Apply. The aspect-ratio choices appear only when no segment is selected. A typical YouTube Short uses 9:16, but you can also select another format for a different destination.
Available video shapes
9:16
Vertical framing for a YouTube Short.
16:9
Horizontal widescreen framing.
1:1
Square framing.
4:3
A more compact rectangular frame.
Adjust the framing for each segment
After choosing the overall aspect ratio, click a particular colored segment in the timeline. Select the same Change Aspect Ratio button again. With a segment selected, the dialog keeps the overall ratio locked and lets you reposition the crop for that segment only. Drag the crop box toward the person or subject who should be visible, then choose Apply. Repeat for other scenes as needed.
Example: two speakers side by side. Keep the entire Short at 9:16. Select the segment where the person on the right speaks and position the crop over the right side. Then select the segment where the person on the left replies and position its crop over the left side. Each segment keeps its own camera position while sharing the same vertical output format. Play through their transition to check the framing. Deselect the segment if you need to change the overall aspect ratio later.
Framing two speakers: an illustration
Keep the same vertical output shape, then move the crop for each selected segment.
First segment
Frame the speaker on the left.
Second segment
Move the frame to the speaker on the right.
Orange outlines represent the visible crop. Deselect segments to change the overall aspect ratio; a selected segment keeps that ratio and changes its own framing. 
Captions and appearance
Correct subtitle text and timing
Open Subtitles and compare the transcription with the audio. Correct any misheard words or timing mistakes. Open Splitter Settings to choose how individual words form on-screen caption groups, then replay the section to check that the text appears and disappears naturally. Subtitle content and timings are separate from the visual styling you choose in the next step.
Choose how subtitles are grouped
Punctuation
Split at sentence or phrase punctuation.
Pauses
Use breaks in speech to form groups.
Character length
Keep groups below a chosen character count.
Word count
Keep each group to a selected number of words.
Fixed duration
Split according to a consistent time interval.
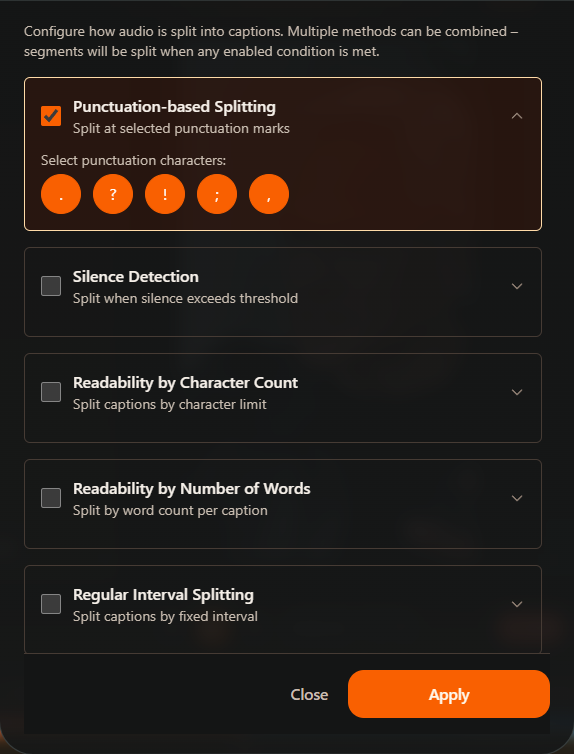
Splitter Settings controls how words are grouped into captions. Choose the methods that suit your clip, then preview the result. Choose how captions look
Open Caption Styles on desktop or Captions on a smaller layout. Turn on Show captions if the words are hidden. Preview a style over different frames and make sure the text remains readable. Choose Edit template to customize supported fonts, sizes and animations, then save the look to reuse later. These appearance controls do not replace the subtitle transcript.
Caption style libraries
Predefined
Apply and preview ready-made caption templates.
My templates
Find caption styles you have customized and saved for reuse.
Choose a video color filter
Open Filters in the editor sidebar and stay on its Filters tab. Browse the preview thumbnails to choose a color treatment for the footage. Try a filter that improves contrast or gives the video a consistent look, and preview it across different shots before keeping it. This changes the video's color appearance; it is separate from the overlaid Effects tab and the motion settings in Animation.
Add a visual effect when useful
Within the same Filters panel, switch to the Effects tab. Choose an optional overlay, such as Vignette, Old Film Grain, Snow, Film, Stars or an Audio Wave treatment. Preview it on the video, especially over captions and faces. The panel selects one effect at a time; choosing another replaces the previous effect, while your color filter remains separate. Choose None to clear the effect without undoing the color filter.
Set entrance and exit animations
Open Animation from the sidebar. In the In tab, choose the motion used when the clip begins; in Out, choose what happens as it finishes. Each side can have its own choice. Select an available animation, adjust Duration and, for styles that support it, Direction. Use None when you want no animation at that point. Preview the beginning and ending rather than choosing motion from the thumbnail alone.
Save and export
Save your Draft as a Modified version
The header shows Draft while you are editing the original generated clip and have not yet saved a modified version. Clicking Save for the first time creates a numbered version (for example, Version 1) that appears in the Shorts workspace under Modified. If you simply leave an unsaved Draft, your editing changes are not preserved. Reopen a saved version through Modified when you want to continue working on it.
When editing an existing Modified version, later clicks on Save update that same version; they do not automatically create a new version every time. The button may briefly show a save countdown (currently 30 seconds) before another save is available. Wait for the saved confirmation. Export also calls Save first, so a successful export request records your current editing settings even when you did not click Save separately.
Use your free exports and download the finished clip
Each Shorts generation project receives free export requests equal to 20% of the number of originally generated Shorts, rounded up. For example, a batch of 10 generated Shorts includes 2 free exports; a batch of 3 includes 1, and a batch of 11 includes 3. The free allowance belongs to the whole generation batch, not to each Short individually. Each new export request counts toward that shared allowance, including exporting a different clip or another edited version.
Select Export to open the confirmation dialog. It shows the project's remaining free exports, or the applicable credit cost once those free exports are used. Free exports do not use generation credits, but account export frequency, monthly allowances, concurrency and quality limits still apply. Confirm to save current edits and start rendering. Return to Exports in the Shorts workspace, download the completed file, and watch it to verify framing, subtitles, effects, animation and audio before uploading.
Help · Common questions
Common questions
How do I select or deselect a segment?
Click its colored strip above the timeline thumbnails. Clicking the same selected strip again deselects it; clicking the timeline ruler also clears the selection. A selected strip shows stronger highlighting and trim handles. Set the global aspect ratio with no segment selected, then select a segment to adjust only its camera position.
Does Draft mean my changes are saved?
No. Draft means you are editing without a saved Modified version. Use Save to create one, and check for the confirmation. Later saves on the same Modified version update it. Export also saves the current changes before rendering.
How many free exports do I receive?
Each generation batch gets 20% of the originally generated Shorts count, rounded up, as free exports shared across the batch. A batch of 10 Shorts gets 2 free export requests. The confirmation shows how many remain, and further exports can require credits while still counting against plan export limits.
Create a TrendyTube account
Create an account to extract clips and continue into the Shorts editor.
Create a TrendyTube account